

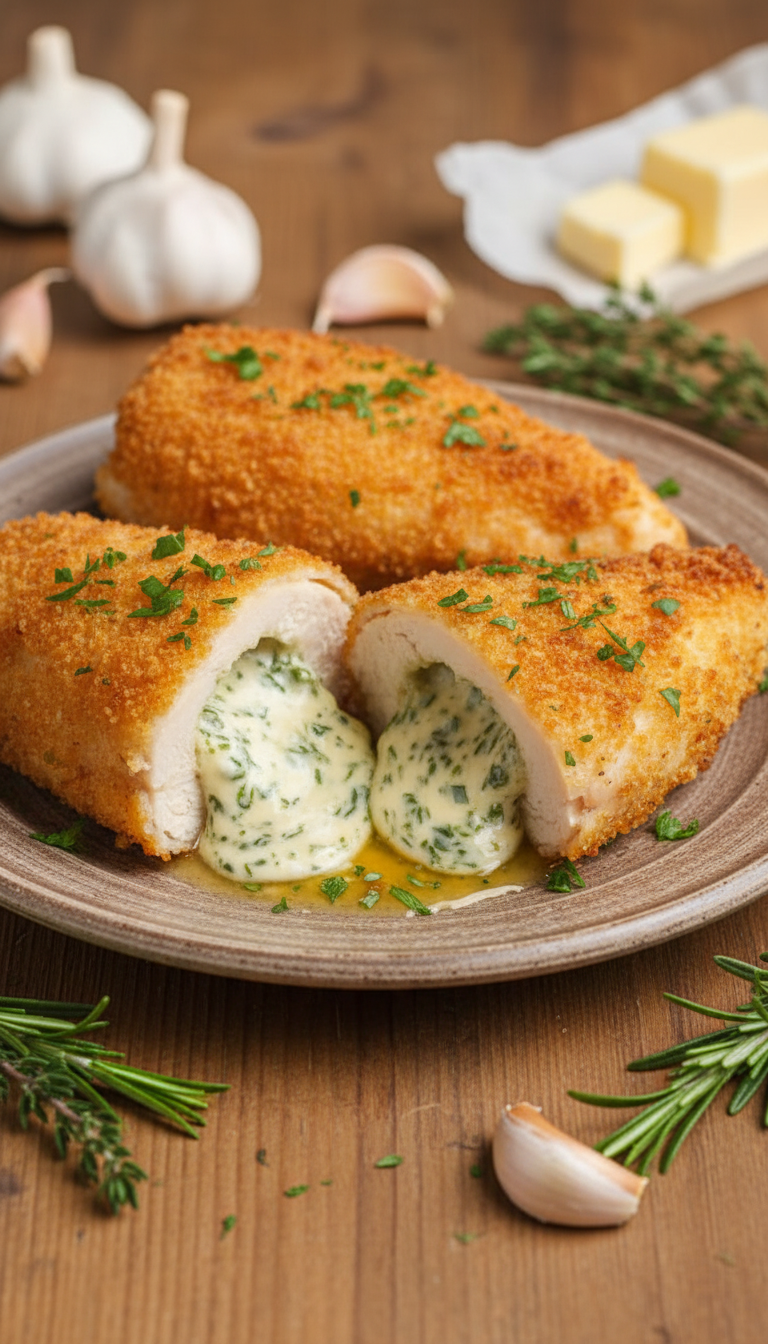
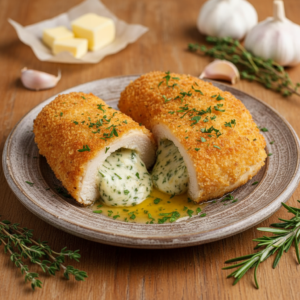
Chicken Kiev is one of those meals that feels fancy but is actually simple. The Gordon Ramsay Chicken Kiev Recipe is crispy outside and juicy inside. Inside the chicken is a rich garlic butter filling. When you cut it, the butter melts out beautifully.
Many home cooks love this classic dish. The Gordon Ramsay Chicken Kiev Recipe brings restaurant flavor to your kitchen.
If you love crispy chicken and garlic butter, you will enjoy it. In this guide, you will learn how to make Gordon Ramsay Chicken Kiev Recipe step by step using simple ingredients.
What Makes This Chicken Kiev Special
Chicken Kiev is famous for its crispy breadcrumb coating and flavorful garlic butter center. The outside is golden and crunchy. The inside stays tender and juicy.
The butter filling is the real magic. It melts while cooking and flavors the chicken. Each bite feels rich and comforting.
This Chicken Kiev Recipe is also fun to cook. It looks impressive but uses basic ingredients. With the right method, anyone can make it at home.
Equipment List
- Sharp knife
- Cutting board
- Meat mallet or rolling pin
- Mixing bowl
- Small bowl for butter mixture
- Plastic wrap
- Frying pan or skillet
- Baking tray
- Parchment paper
- Tongs
- Oven
Recipe Overview
- Recipe Name: Gordon Ramsay Chicken Kiev Recipe
- Servings: 4 servings
- Prep Time: 25 minutes
- Cook Time: 20 minutes
- Total Time: 45 minutes
- Course: Main Course
- Cuisine: European / Ukrainian-inspired
- Calories: 520 kcal per serving
Ingredients You Need for Gordon Ramsay Chicken Kiev Recipe
Here are the Ingredients for Gordon Ramsay Chicken Kiev Recipe.
- 4 chicken breasts
- 4 tbsp unsalted butter (softened)
- 3 garlic cloves (minced)
- 2 tbsp fresh parsley (chopped)
- 1 tsp lemon juice
- 1 cup all-purpose flour
- 2 eggs (beaten)
- 1½ cups breadcrumbs
- Salt to taste
- Black pepper to taste
- ½ tsp paprika
- Vegetable oil for frying
These simple ingredients create a crispy coating and a flavorful butter center.
Step-by-Step Guide
1. Prepare the Garlic Butter
Take a small bowl. Add softened butter, minced garlic, parsley, and lemon juice. Mix everything well until smooth. Season lightly with salt and pepper. Place the butter mixture on plastic wrap and roll into a small log. Freeze it for about 20 minutes so it becomes firm.
2. Prepare the Chicken Breasts
Place each chicken breast on a cutting board. Use a sharp knife to slice it open like a book. Cover the chicken with plastic wrap. Gently pound it with a meat mallet until evenly thin. This step helps the chicken cook evenly.
3. Add the Butter Filling
Take the chilled butter log from the freezer. Cut it into four equal pieces. Place one piece in the center of each chicken breast. Fold the chicken around the butter carefully. Roll tightly to seal the filling inside.
4. Coat the Chicken
Prepare three bowls. Put flour in the first bowl. Place beaten eggs in the second bowl. Add breadcrumbs mixed with paprika in the third bowl. Roll each chicken piece in flour first. Then dip it into the egg. Finally coat it well with breadcrumbs.
5. Chill the Chicken Rolls
Place the coated chicken rolls on a tray lined with parchment paper. Refrigerate them for about 15 minutes. This step helps the coating stick better and keeps the butter inside while cooking.
6. Fry the Chicken
Heat vegetable oil in a skillet over medium heat. Carefully place the chicken rolls in the hot oil. Fry them for about 3–4 minutes on each side. The coating should turn golden and crispy.
7. Finish Cooking in the Oven
Preheat your oven to 180°C (350°F). Transfer the fried chicken onto a baking tray. Bake for about 12–15 minutes. This step cooks the chicken fully while keeping the crust crispy.
8. Serve and Enjoy
Remove the chicken from the oven and let it rest for two minutes. Cut it gently and watch the garlic butter melt out. Serve hot with your favorite sides.
Expert Tips & Variations
- Freeze the butter before using. This prevents it from leaking while cooking.
- Double coat the chicken for an extra crispy crust.
- Add chopped dill to the butter for more flavor.
- Use panko breadcrumbs for extra crunch.
- Add grated parmesan to the breadcrumbs for a cheesy twist.
- Try air frying for a lighter version.
Interesting Facts About Chicken Kiev
Chicken Kiev has an interesting history. Many people think it comes from Ukraine. However, French cooking techniques also influenced it.
The dish became popular in Europe during the 19th century. Later, it spread around the world.
Restaurants love serving Chicken Kiev because it looks impressive. The melted butter surprise always delights guests.
Perfect Dishes to Serve With Chicken Kiev
Chicken Kiev pairs well with many side dishes.
- Creamy mashed potatoes
- Steamed green beans
- Buttered rice
- Roasted vegetables
- Fresh garden salad
- Garlic bread
These sides balance the rich garlic butter flavor of the chicken.
Storage and Reheating Tips
- Store leftover chicken in an airtight container.
- Keep it in the refrigerator for up to 3 days.
- Freeze uncooked chicken rolls for up to 1 month.
- Reheat in the oven at 180°C to keep the crust crispy.
- Avoid microwaving because it softens the coating.
Nutrition Information
| Nutrient | Amount per Serving |
|---|---|
| Calories | 520 kcal |
| Protein | 36 g |
| Fat | 28 g |
| Carbohydrates | 30 g |
| Fiber | 2 g |
| Sodium | 420 mg |
Health Benefits
Chicken Kiev provides a good amount of protein. Protein helps build muscles and keeps you full longer. Chicken is also a great source of vitamins like B6 and B12.
Garlic in the butter mixture may support heart health and immunity. When enjoyed with vegetables or salad, this dish can be part of a balanced meal.
FAQs about Gordon Ramsay Chicken Kiev Recipe
1. How do you keep the butter from leaking out?
The key is freezing the butter first. Also roll the chicken tightly around the filling. Chilling the coated chicken before cooking also helps seal everything inside.
2. Can I bake Chicken Kiev instead of frying?
Yes, you can bake it. Brush the coated chicken lightly with oil. Bake at 200°C for about 25 minutes. It will still become crispy and delicious.
3. Can I make Chicken Kiev ahead of time?
Yes. You can prepare and bread the chicken rolls earlier in the day. Keep them in the refrigerator until cooking time. This makes dinner preparation easier.
4. What is the best breadcrumb for Chicken Kiev?
Panko breadcrumbs work best. They create a light and crispy coating. Regular breadcrumbs also work well if panko is not available.
5. Can I use chicken thighs instead of breasts?
Yes, but chicken breasts work better for rolling. They are larger and easier to stuff with butter.
Final Thoughts
The Gordon Ramsay Chicken Kiev Recipe is crispy, juicy, and full of flavor. The garlic butter center makes every bite special. It looks fancy but is surprisingly easy to cook at home.
Once you try how to make Gordon Ramsay Chicken Kiev, it may become a family favorite. Gather the ingredients for Gordon Ramsay Chicken Kiev Recipe, follow the steps, and enjoy this classic dish with your loved ones.
Gordon Ramsay Chicken Kiev Recipe
Ingredients
- 4 chicken breasts
- 4 tbsp unsalted butter softened
- 3 garlic cloves minced
- 2 tbsp fresh parsley chopped
- 1 tsp lemon juice
- 1 cup all-purpose flour
- 2 eggs beaten
- 1½ cups breadcrumbs
- Salt to taste
- Black pepper to taste
- ½ tsp paprika
- Vegetable oil for frying
Instructions
Prepare the Garlic Butter
- Take a small bowl. Add softened butter, minced garlic, parsley, and lemon juice. Mix everything well until smooth. Season lightly with salt and pepper. Place the butter mixture on plastic wrap and roll into a small log. Freeze it for about 20 minutes so it becomes firm.
Prepare the Chicken Breasts
- Place each chicken breast on a cutting board. Use a sharp knife to slice it open like a book. Cover the chicken with plastic wrap. Gently pound it with a meat mallet until evenly thin. This step helps the chicken cook evenly.
Add the Butter Filling
- Take the chilled butter log from the freezer. Cut it into four equal pieces. Place one piece in the center of each chicken breast. Fold the chicken around the butter carefully. Roll tightly to seal the filling inside.
Coat the Chicken
- Prepare three bowls. Put flour in the first bowl. Place beaten eggs in the second bowl. Add breadcrumbs mixed with paprika in the third bowl. Roll each chicken piece in flour first. Then dip it into the egg. Finally coat it well with breadcrumbs.
Chill the Chicken Rolls
- Place the coated chicken rolls on a tray lined with parchment paper. Refrigerate them for about 15 minutes. This step helps the coating stick better and keeps the butter inside while cooking.
Fry the Chicken
- Heat vegetable oil in a skillet over medium heat. Carefully place the chicken rolls in the hot oil. Fry them for about 3–4 minutes on each side. The coating should turn golden and crispy.
Finish Cooking in the Oven
- Preheat your oven to 180°C (350°F). Transfer the fried chicken onto a baking tray. Bake for about 12–15 minutes. This step cooks the chicken fully while keeping the crust crispy.
Serve and Enjoy
- Remove the chicken from the oven and let it rest for two minutes. Cut it gently and watch the garlic butter melt out. Serve hot with your favorite sides.
Notes
- Freeze the butter before using. This prevents it from leaking while cooking.
- Double coat the chicken for an extra crispy crust.
- Add chopped dill to the butter for more flavor.
- Use panko breadcrumbs for extra crunch.
- Add grated parmesan to the breadcrumbs for a cheesy twist.
- Try air frying for a lighter version.

Emily Carter is a passionate home cook and recipe creator. She shares easy, family-friendly meals with a modern twist. Her focus is on simple ingredients, clear steps and soulful, delicious food that everyone can enjoy.